
There's also a page of Hints and Tips for the Ignition and Electrical Systems.
Visitors to these pages may also find it worthwhile to visit the Alternative Parts page.
For an overview of the pleasure that is to be had from restoring a Vire 7 to its former glory, it's hard to beat The Saga of the Sloop, Slow Ride. Apart from being an interesting read, the author even gives a few handy hints about alternative parts. There's also a couple of nice pictures showing how to set up your Vire 7 for "bench testing". Note that the "auxilary cooling unit" (a.k.a. the bucket of water) is at the same height as the engine. This is a tried and trusted setup. If you put the engine on a raised bench and leave the bucket on the ground a metre below, the water pump will have trouble sucking anything. Webmaster's Note: Thanks to TVG in New Jersey for pointing out this potential pitfall.
Some owners will tell you that the Vire 7 is a sensitive creature, but not everyone agrees. There's a guy in North America who broke just about every rule in the book when "restoring" his Vire 7 and still got it to go. His story of how (not) to rebuild a Vire 7 should be compulsory reading for anybody who is beginning to despair of ever getting their's to run properly.
For a more positive tale, full of positive advice, and including detailed information on replacing the big-end bearing, you must read David Wells illustrated account of his "two into one" rebuild.
But when you have your Vire 7 running there is still room for problems and mistakes...
Don't panic. This may be a very simple problem to fix. The design of the gearbox means that it has a "servo" effect, the rotation of the engine holding it in gear. This effect increases as the engine revolutions increase. If you don't close the throttle before trying to select neutral, or if the idle speed is set too high, it becomes very difficult to disengage the gears. If you find that the gearchange works easily with the engine stopped, but tends to stick when the engine is running, even when cold, then this is your problem. Check the idle speed. The engine should be set so that it idles at about 1000 RPM when in gear, and should not idle at more than 1300 RPM in neutral.
Maybe you should consider using a different oil in the gearbox. Here's Iain's story, all the way from Scotland: -I have used a Vire 7 engine in my Eygthene 24 'Vital Spark' since 1977 ! I had experienced problems with the engine sticking in gear intermittently. It was noted that after a long run at full power the gear selector lever might need more force applied than the normal very light touch.The solution to the problem, in my case, was to use 20/50 engine oil in the gearbox instead of the gear oil recommended by the manufacturer. This cured the problem to the extent that the gearbox could always be returned to neutral. David, also somewhere in the UK, was getting stuck in both forward and reverse (it must be something to do with the climate). He endorses the "different oil" approach:- I tried the trick of replacing the gearbox oil with normal 20/50. Problem cured.
Okay, so that was easy. Alas, not all sticky gearchanges are so easily resolved. But take heart, the following tales both have a happy ending - even though William Woods found himself stuck solid in gear and, worse still, the Webmaster ended up stuck in reverse.
From CA, Scotland: I have a Vire 7 engine in my 22 foot sailing boat, and had a problem which might interest others.
The engine was fine last autumn but would not start this spring. There was a good spark, fuel was reaching the engine, compression was good and I couldn't find anything wrong. A marine engineer had a look and suggested I take out the crankcase drain plug. On doing this a large quantity of petrol drained out; then when the plug was replaced the engine started without any difficulty.
It seems petrol had been leaking through the carburettor and into the crankcase over the winter, a problem exacerbated by me, when I repeatedly squeezed the priming bulb on the fuel line. I now have a fuel tap fitted close to the carburettor and barely prime the system before starting. New membranes etc. in the carburettor have helped too and the engine now runs sweetly.
From Andrea Luecke, Germany - I made a mistake; I built the tank with a "bulb" hand-priming pump in the fuel line. This pump is used in external tanks that can be removed from the boat - you pump the bulb to get the fuel in the engine. I did that in my Vire, but the engine is mounted lower than the tank. I got too much fuel in the engine and it flooded. So I have removed the bulb and now use just a stop valve.
If you've toured this site, or if you've owned your Vire 7 for more than one season, then you already know to change the spark plug. If that doesn't solve the problem, then you probably need to check the fuel. The fuel should be completely liquid. Lumps of solid material of any kind are sure to block something important, usually in the carburettor. John's experience is not untypical: -
We went through decreasing power on H*** earlier this summer. She stalled one evening as I was entering the St Claire river from Lake Huron. The St. Claire is a major shipping river and currents up to 4 km. Ended up going sideways down the river! Decided I was stupid to be putting up with this and had a mechanic over. I started the Vire and he immediately said the carburetor was dirty/clogged. After cleaning the carb out she purrs. He said there is a screen high up in the carb which was clogged as were some other vents or whatever. (I am mechanically challenged obviously). Just another source to check if your Vire is slowing down.
Even when the fuel itself is okay, fuel supply can still be an issue; and the problem does not always occur in the carburettor. Terry wrote:-
I launched my boat a few weeks ago and had a problem with the engine losing power and stalling. I had tested it before launch and it started and ran fine in neutral. While motoring along it would run fine for a few minutes and then lose power and stall. It would restart ok and then repeat the process. It turns out that the valve in the fuel line from the gas tank, all of which appeared to be the original, (circa 1975) was not a proper valve for the line. It was apparently sucking in air through the valve ,which caused the loss of power. It was a relatively easy fix and the engine works fine now.
Here's George Dawson's description of his problem:-
My vire 7 starts easily but has a tendency to over rev; it is not possible to reduce the revs to less than 2000 rpm. It is possible when starting to put the boat in gear and motor for a short distance before the engine stops. When started in neutral it runs for a short time at about 1500 revs and then accelerates to such a pitch that I have to switch off the ignition to prevent the engine being damaged.
Having been advised that it sounded like a case of fuel starvation (the over-lean mixture causing the engine to "race"), Georg inivestigated further: -
I disconnected the fuel pipe from the bottom of the carb and took out the circular piece of fine mesh (which I had already washed in petrol) and examined it closely. Although the mesh looked clean, close examination showed that oxidation had tended to close up the holes, obviously restricting the flow. I removed the mesh, started the engine ,adjusted the jets and it ran perfectly. I have now left the mesh out and fitted an external fuel filter in the fuel line.
Of course, it doesn't have to be a fuel problem. This is Michael's story: -
One of the problems I ran into was an intermittent gradual loss of power that would come and go at random. Suspecting dirty gas I switched to a new fuel tank, installed an inline fuel filter, took the carburetor all apart and cleaned it out not once but twice. Some time later after much aggravation I put in a new ignition wire and that fixed the problem - the old wire was just too old.
This complaint is not uncommon, especially with older engines. Take a look at John's tale, immediately above. If that doesn't solve the problem then, before you go ripping your Vire 7 apart, how's your exhaust? The previous owner of the Webmaster's boat de-carbonised the exhaust after the engine had been run on a 33:1 petrol:oil mix for 24 years. The improvement in performance was reported to be spectacular.
Dave in Canada offers a similar report. His description of the problem was that the engine seemed "to run and idle ok but it has very little power left. If you try to go past half throttle it starts to boug down." A few days later he reported triumphantly that he had "solved the engine problem! After 25 years the exhaust system was plugged with carbon thereby restricting the power of the engine."
Ron goes into a little more detail:- I was on week long cruise up in the 1000 Islands earlier this summer, and my engine performance gradually declined over the course of the week from being able to do a good 6 knots to 2.5-3 by the end of the week. This was after using the engine significantly more in a week than I had in the past year that I'd owned the boat. The engine ran just fine at idle, but had no power above about 1/3 throttle. I replaced the spark plug, but that didn't make any difference...so having virtually no skill with engines I threw in the towel and turned it over to my marina's mechanic. He replaced the spark plug again, adjusted a few settings, and after $108 the engine still wasn't any better. He was ready to start replacing gaskets in the carburetor, but before I let him go ahead I checked your web site for any tips, and found the exact description of my problem... I spent about an hour disconnecting the exhaust line and clearing out the accumulated carbon deposits. The ~1.5" diameter pipe had been clogged to the diameter of an uncooked piece of spaghetti!
Ron's "spaghetti" analogy may be an exaggeration; but maybe not. Having removed the engine to replace the waterpump seals, the Webmaster decided to take the opportunity to conduct a routine check on his own exhaust. The internal diameter was less then 1cm, and the narrowing extended for more than a metre along the (straight) exhaust pipe! There's also a story at www.wyc.ca/info/exhaust/vire_7.htm that supports the experience - complete with photographic evidence of a pencil stuck in the middle of a very messy blockage. That author gives his technique for clearing the blockage, but see below for more information about how to clean the exhaust.
There is a variation on the above theme. Many Vire 7s have been fitted with "flexible" exhaust systems. Such systems require to be cooled in some way, usually by injecting some or all of the cooling water into the system. Failure of the cooling system can lead to overheating and may cause the inner lining of the flexible exhaust to separate from the outer casing and collapse inwards, partly obstructing the exhaust. Old age, or previous episodes of overheating, may have a similar effect.
Sometimes, the problem is less obvious. For example, when is full throttle not full throttle? Here's Enda's story.
I have finally found a source of loss of power after a period of heartache!!
I knew I was losing power due to fuel issues. I could not get the engine
to remain at full power after it had run steadily for a period (30 mins to
one hour plus). Or if I applied power rapidly, the engine would return to
idle or stall.
I removed carb and found some rubber particles from the fuel line seal at
base of carb. Easy fix...but not the real problem.
The real problem manifested itself when I noticed that the lever on the butterfly
throttle control was "freewheeling"... i.e. it had lost grip of the shaft
and I noticed the throttle valve returned to closed position after a rotation
due to the spring return. Obviously with any vibration and heat this condition
would get progressively worse. I believe that this contributed to gradual
loss of power as a cruise went on. I notice the shaft is not splined and
is very smooth.. .so the screw needs good tightening, perhaps a little gasket
cement to retain position. This is not obvious when mounted on the engine
and difficult to check, unless you remove cable link and test for
looseness/tightness... i.e. it should only travel approx 90 degrees.
The Webmaster has had a related experience. His three-year-old daughter stepped down onto the remote throttle lever, forcing it past the full-throttle position. It was easy to push back, but he didn't realise that one of the cable clamps had slipped, so that full throttle position on the remote lever was no longer opening the throttle butterfly completely. He spent a very frustrating week running at very slow speeds, then wasted an afternoon removing and cleaning a perfectly good carburettor. It was only when he had refitted the carb and was trying to reattach the remote throttle cable that he realised what was wrong.
From JD, USA: A quick note on the carburettor for the Vire 7. I rebuilt the carburettor about two seasons ago; I even replaced the Welch plug. Well this year the engine started to run terrible: went through plugs one after the other; lots of smoke. Recently it just started stalling. Well I finally opened up the carburettor and found the welch plug missing completely. It seems the plug is made of zinc or tin. I had a lot of stray current from a failed voltage regulator; it must have sacrificed the plug.
Believe it or not the engine still ran, just not very well.
From Tero Stjernstoft, Sweden: I was plagued with intermittent "sooty plugs". Finally I found the core problem: one of the blanking plugs inone of the service holes in the carburettor was loose. Service holes are made during the manufacturing process in order to make the nozzles for the two adjustment screws. Afterwards these holes ae plugged so that the gasoline flow goes though the adjustment screws. One of these plugs was a bit loose. Sometimes the plug sealed, resulting in prefect engine running. Sometimes the plug leaked, resulting in too rich mixture and soot. The solution was to put some Plastic Padding in order to seal the plug!.
Want to know how to clean the exhaust? There are at least three different techniques. Here's Ron's description of how he did his:-
I removed the metal portion of the exhaust line from both the engine and the flexible exhaust line leading to the thru-hull, as well as disconnected the water line, and brought the metal pipe up into daylight and onto the dock. We're talking about a big, thick steel pipe here, so I just stuck a big screwdriver in and scraped out the carbon buildup. Took about 10 minutes to get it cleaned out. Nearly all the crud appeared to be within the first couple of inches of the pipe, so the fact that there was an elbow in the pipe within the first 3-4 inches didn't end up being a problem. It's a very messy job that's probably best done OFF of the boat, because the carbon is partly dry, and partly the consistency of tar, and tends to fly all over the place as you're scraping it out.
They say that "a picture paints a thousand words". Here, in series of pictures from Veli-Antii, is how to burn the deposits out of the exhaust.
Mike Hanyi offers a safer variation on Veli-Antii's "oxy-acetylene" technique. Once you have the carbon glowing nicely, turn off the acetylene and turn up the oxygen. That's enough to keep the carbon burning merrily until it is no more, without the risk of the torch making anything too hot.
Maybe chemical cleaning is more your style. JM doesn't own a boat, but he knows a bit about clogged exhausts and how to clean them: "I have a Vespa, and regular as clockwork, I have to do the same thing. Despite it having an auto-oiler, it still chokes up. The cure, if you haven't got oxy/acetylene/insurance, or are just plain afraid, is marginally less dangerous, but none the less good at curing it: Caustic Soda.
Nasty stuff it is. Bung one end of the pipe, and fill the other end with a strong Caustic solution. Leave it to stand, say overnight, the weekend even. And then empty it out, safely. This stuff eats skin. Do not let it contact aluminium, as it eats that too. Watch the bogwater-coloured stuff that comes out, and marvel at the weight loss. Voila, one cleaned exhaust. Your engine will now sound different too, with a nice ring-ding-ding.
The usual caveats apply: gloves, goggles, apron (not frilly!). Oh, and you're on your own - you didn't get this from me ! Hope this is of help.
Happy cleaning!
Not so easy. The first solution sounds like it comes from Heath Robinson, but in fact it is courtesy of JK in California:-
"Here is an idea that I have adapted for measuring the temperature on my Vire 7. I found a battery-operated digital "cooking" thermometer. It has a 3 foot cable to hard sharp piece that is to be stuck into a large slab of cooking meat. I ran the sharp piece down to the motor and secured it to the outside wall of the cylinder head. It does not give the precise temp but it does let you establish a reference to go by. Recently I had to motor for many hours and when the temp began to rise above what I had determined to be safe, I would lower the RPMs and bring the temp down. "
From Gerhard Van Wyk: - It's possible to fit a water temperature gauge, such as those made by VDO. The sensor is best located somewhere on the cylinder block. One suggestion, not ideal because it is at the bottom of the block, is to use the drain hole on the starboard side, just below the zinc-coated frost bung (Part #11 in Figure 11 of the Spare Parts Lists). Better still, some blocks have a threaded outlet at the top, on the opposite side to the inlet pipe.
From Pete Clarke: Because I have had two impellors go in the last few months (both had the same problem of the brass centre part becoming detached from the rubber ) I decided that I would repair the impellors by re-bonding them with West System epoxy.
I tried this some time ago and have since had no problem with the impellor. I think the original impellor design is weak. For example, Johnson impellors have lugs on the rubber-to-brass join, which means they cannot easily become detached.
I think my new epoxy bond may be stronger than the original !
This seems to be a very common chore, so I've devoted a complete page to it - just click here.
This is another topic of such importance that I've devoted a complete page to it - just click here.
If you've got poor water flow (less than 2 litres/minute at 1000 RPM), but the impellor's okay and the inlet isn't blocked, then the commonest site for obstructions is in the cylinder block, just inside the fitting where the hot water leaves the engine (see Spare Parts Lists, Fig. 11, Part #22). But sometimes, the problem is the fitting itself. Here's Tom's story:
Several years ago I installed a high-temp alarm in the hose leading from the engine to the exhaust bend. The alarm is set to sound a buzzer if cooling water temperature exceeds 200 F (93 C). At launch this year, just to add to the general excitement of being back in the water, I had to shut the engine off when the alarm sounded just as the boat reached dock. After checking the obvious (i.e. forgetting to open the cooling water intake seacock, or a damaged impeller) and finding nothing wrong, I began trouble-shooting. When I removed the hose leading from the engine to observe the amount of water exiting the engine, I discovered only a trickle of very hot water. I removed the fitting by which the hose connects to the engine (see Spare Parts Lists, Fig. 11, Part #22). On some Vire 7s this is a simple elbow (PN#18208) but on my engine this part is called the "Banjo" (PN#22811). This 'Banjo' has an internal ball with two small holes drilled. Unless one of these internal holes is perfectly aligned with the outlet tube of the fitting, all cooling water flow is blocked. If this fitting is bumped or gradually loosens over time due to vibration (as I suspect was the case with my Vire) it acts like a ball-valve and gradually or completely restricts water flow. Alignment of these internal holes can be assured by inserting a cotter pin through the hose barb end of the fitting into the drilled internal holes while tightening the 'Banjo' into position.
Here's what SB in Western Australia has to say: - The waterpump is a cursed failing in this engine and I put up with it for only a short time; I used an impellor from a Mariner 15hp engine with success. I found that I had to bore out the shaft hole a bit to get it to fit. This solved the costly replacement but still leakage was a problem.
I finally solved the whole thing by purchasing a small Johansen rubber vane pump. This was mounted on a stainless steel bracket with elongated holes. The bracket was silver soldered to the underside of the stainless steel muffler near the water pump shaft. I then got a pair of timing belt pulleys; one very small for the output from the gearbox and a 2.5" one for the pump. This reduction was necessary to reduce the pump output. I actually also reduced the size of the shoe inside the pump as well to further reduce output but this might have been overkill.
This system became completely trouble free and lasted as long as the water was relatively clean.
In this system, the original waterpump has been completely removed, in order to use the little driveshaft at the rear of the gearbox to drive the new pump.
Although he is not a fan of the original waterpump, SB goes on to endorse the engine: - I think that the Vire 7 is a good simple engine and apart from the water pump most things are robust enough to last well.
Another Aussie, Kevin, tells us about his waterpump, which is set up at the front of the engine. Here is his description of how to make the modification:-
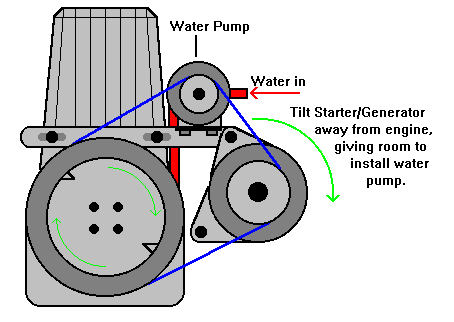
John, in the UK, decided to avoid the hassle of setting up and aligning an alternative mechanical waterpump, by opting instead to replace the original pump with a small electric pump: - We fixed the waterpump problem by fitting a remote electric pump and removing the original pump housing to get it out of the way of the down pipe. We are using a Jabsco Mini Puppy, Model 8860-1203. It draws 6 amps at 12 volts DC and weighs 1.8 kg, and it pumps just over 7 litres per minute. It is still working satisfactorily [one month later] and we are wondering if we will bother to put in a belt driven pump over the winter.
It is worth noting that John's "pump transplant" came too late to save his gearbox from the water that seeped in from the faulty seal, so he ended up stuck in gear. He fixed that in the time-honoured fashion outlined above, by taking off the gearbox, thumping the clutch with a big hammer, and reassembling the whole lot with plenty of clean oil.
Steve, in the USA, followed John's approach: - I bought a used Vire 7 off the Internet, and have been very impressed with the little motor. Thanks to this website, I was warned of the one weak point of the motor with the cooling system. Rather than take a chance with the water in the transmission oil and other problems with the built in pump, I used a Bait Well pump from West Marine. These pumps are common at any store that sells marine supplies and are not expensive. The pumps are designed for continous use and run about 25 to 35 U.S dollars.
The one I bought is rated at 500 GPH and has a built in filter that can be easily changed. This feature is important for the small inlet and outlets on the motor and can help keep debris out of the engine. The pump supplies a good stream of water through the motor. I hooked my pump to the ignition switch, and when I turn the key the motor is already supplied with a cooling stream of water.
Another tip from SB in Western Australia: - To keep the problem of accurate engine/shaft alignment and to have a very quiet engine in my little 15' clinker boat I did a couple of things: -
This system is the same as some of the very expensive set ups you can buy for marine use. The advantage is of course cost and simplicity. All the parts are cheap and the CV set-ups on the old VWs were simple and easy to adapt and could be bought cheaply from a motor wrecker.
This set up was really effective as the motor was at the right attitude, yet able to vibrate as it wanted without transmitting noise to the hull. In fact the only noise that came out of the engine box was a rather irritating carbie pulsing; a good intake muffler would sort that out.
Have you ever felt slightly underpowered, but didn't want to go to the expense of installing a bigger engine - or maybe you don't have room for anything bigger. For the mechanically minded, here's how one owner modified his Vire 7 to increase the torque of his engine at low revs.
From David Wells: After reading the article on your site about the length of induction tube I changed the airfilter mounting to fit an air filter and casing from a Subaru Vivio. This has about 12" of tube before the airbox and seems to make the engine carburate more cleanly and is much much quieter. No more chuffing.
From Pam & Bren: I have a Vire 7 fitted to an Intro 22. I found that the angle of pull was totally impractable for hand cranking from the engine pully. I overcame this by mounting a pulley above the engine to turn the pull through 90 degrees. I now have a clear pull into the saloon.
From Dick Davidsson, Sweden: For the past fourteen years I've been fighting with my Vire 7. The engine is installed below the waterline, and I kept finding my engine flooded (literally) every time that I forgot to close the stopcock on the cooling water inlet. But last summer I won the battle. I've re-routed the water hose between the water pump and the engine, and used a non-return valve from a garden hose to break the siphon. As an added bonus, it is now much easier to re-fit the water pump after removing it to change the impellor. Click here for details and diagrams showing this simple modification.
We're talking about Parts #23 and #24 in Fig. 11 of the Spare Parts Lists. Don't replace these plugs with steel plugs. Many owners don't realise that the freeze plugs double as sacrificial anodes, although that means that they corrode through with annoying frequency. The problem is that the Vire 7 was designed for the low-salt environment of the Baltic Sea. It's okay too in freshwater, but now that the engines are to be found all over the world, they don't like the taste of salt and the plugs corrode too quickly. If you are fed up replacing them, or if you can't find suitable replacements, don't worry. Mike Hanyi sent this solution from Finland: -
We rebuilt a Vire 7 in 1989. All the freeze plugs were replaced then, but one season after getting in the water the freeze plug rusted through. It was replaced, but then the next year another let go.
The problem is/was that the Vire engine does not have a zinc pencil. My father came up with this solution: -
In the left rear of the cylinder head, the standard freeze plug was removed and a rubber cork for a test-tube was installed. A standard 1/4" (6mm) zinc was put through it and, as the zinc has threads on it, Dad made a wire with a ring terminal that was bolted on with a 1/4" nut. The other end of the wire was GROUNDED to the engine - the zinc is useless unless grounded.
My father replaced the zinc every spring from 1990-2002 when the boat was sold, and he never needed to replace another freeze plug in all that time.
From Mike Hanyi: - Apart from the exhaust gasket (see below), all gaskets can be made by purchasing gasket paper, and with some Form-a-Gasket (or equivalent gasket cement) LIGHTLY gluing a piece to the surface of the part. Then, with the ball end of a ball-peen hammer, lightly tap the edges of the part through the gasket paper, thus cutting a perfect gasket (this trick I learned from being a automotive mechanic for 10 years).
From the Webmaster: - The cylinder head gasket (Part #25 in Fig. 11 of the Spare Parts Lists), the gasket between the crankcase and the gearbox (Part #28 in Fig. 11 of the Spare Parts Lists), and the water pump gasket (Part #4 in Fig. 16 of the Spare Parts Lists) are all paper gaskets, 0.20mm thick.
From Gerhard Van Wyk: - The gasket on the waterpump (the ones the dealers sell us) are too thin, resulting in the impeller vanes scraping the sides of the pump. This will result in the impeller tearing loose from the bushing. If you use the next thickness of packing material you may have more success - it is a question of trail and error. Also, do not be shy with the vaseline or waterproof grease when you install the new one.
From Mike Hanyi. The gasket from the aluminum resonator (exhaust gas collector) to the exhaust pipe can be replaced with a standard VW Beetle exhaust gasket.
I suspect that you are looking at a small fitting on the top of the crankcase, starboard side, near the join with the gearbox. Take a look at the crankcase fitting on this partially-dismantled engine. Are you wondering about the fitting marked with the yellow arrow ? If you are, then you join quite a long list of owners who either have no idea of what it is, or who thought that it leads into the crankcase.
Although from the outside the fitting looks as though it opens into the crankcase, in fact it leads into the gearbox. The photo shows that the after end of the crankcase is concave, and that the gearbox in fact extends forward of the join between the gearbox and the crankcase, so it's an understandable mistake. Incidentally, not all engines have the fitting (mine doesn't - which is why it took me several months to find out the above).
As for its role, it's a breather tube for the gearbox. And if "milk-coloured oily goop with some water" is coming out of it, then you're in trouble. The seals at the water-pump are leaking, and you're looking at an oil-and-water emulsion. That is a bad gearbox lubricant. You're only one short step away from a Sticky Gearchanges / Getting Stuck in Gear situation (which, because of the tilt of the engine, is more likely to happen in reverse than in forward). Once you realise how serious the potential problem is, you should then visit the section about Replacing the Water Pump Seals.
From Pete Clarke. I use a Gunson Colourtune (Colortune) to set the mixture screws. It is a see-through spark plug, so you can see the colour of the burn in the cylinder. Light blue is the burn colour to aim for and I've used it to set both the tickover and fast run screws on the Vire.
In my view it is much more likely to set up accurate settings than using the Vire instruction book method. If you can see the burn colour you know that it's right. It's as simple as that.
The Hints & Tips Pages have grown a lot since they were first established, but there's still plenty of room for more information. Why not E-mail the Webmaster with your own contribution? We Vire 7 owners need as much help as we can get.


