There's also a page of Hints and Tips for the Mechanical Components (including the cooling and exhaust systems).
Visitors to these pages may also find it worthwhile to visit the Alternative Parts page.
The Operator's Manual often mentions adjusting the engine to run at certain Revolutions Per Minute (RPM). But how do you measure the RPM ? One answer is to use a Tach / Dwell Test Meter. Click here for detailed information on how to do it.
It's not very difficult: -
From Iain: - My magneto coil developed a fault in the high voltage winding. The cost of replacement was unacceptably high. I cut all the windings from the magneto core with a hacksaw. A layer of varnished linen was wrapped over the core. A new primary winding, with varnished paper between each layer of wire, was wound over the linen. The completed winding was baked in an oven to cure the varnish. A standard car ignition coil was connected across the new winding. I believe this system is (was) common in motorcycles and is referred to as energy transfer ignition. This arrangement worked well for almost 10 years (then I decided to go high-tech and fit capacitor discharge (CD) ignition).
The advantage of this system is that no external power is required. When the contact set opens the self-induced high voltage pulse (200-250 volts) appears across the primary of the car coil generating the spark voltage at the secondary winding.
Three features of the Vire 7 enhance its suitably as an auxiliary engine for a sailboat. One is the fact that it is two-stroke, not four-stroke, so it doesn't have an oil sump. A second is the diaphragm-type combined carburettor and fuel pump. These two features together allow the engine to operate perfectly even when heeled considerably, so that it can be used for motor sailing. The third feature is the magneto ignition system, which doesn't require a battery or any external wiring. Just start the engine and keep supplying it with petrol (gasoline) and it's happy. A flat battery, or even no battery, doesn't matter. Alas, at least one owner in North America has had difficulty in sourcing a replacement ignition coil for his Vire 7. Undeterred, he has discovered how to change the circuit to a standard circuit as found in a common-or-garden automobile (car) engine. Okay, so now he needs a battery, but it's still easier (and cheaper) than buying and installing a new engine. Click here to find out how to do it.
Following Iain's repairs to his magneto, here's how he went really high-tech: - The next development was to install capacitor discharge ignition. The spark plug gap was increased to 50 thou. This is not a problem as the CD ignition can easily fire across this gap due to the very low compression ratio. This transformed the engine from a quirky curio to a reliable and economical machine with the following advantages.
Fons, in the Netherlands, gives a bit more detail about how to do it: - I've developed a transistorised (electronic) ignition system. Please check www.velleman.be; with this system you can avoid burned contact breaker points and weak condensors. Especially, motors used in salt water wil be much more reliable.
I've got two additional pieces of advice:
From Chris, who did it first on a Vire 6: - The dynastart on my old Vire 6 never gave sufficient charge, so I added an alternator. The alternator I used was a car alternator rated at about 60-70 amps. It was mounted on the engine bearers. The dynastart pulley was replaced by a double pulley with the second groove used to drive the alternator by belt. It does not overload the engine!
When the engine first starts it usually charges at about 10-15 amps for a few seconds and then drops back to 0 as the battery becomes fully re-charged. If the battery is very low (overnight stop etc.) then it may charge at up to 30amps but this again drops back to a low charge after a very short time. Under normal running conditions it takes less power than the dynastart dynamo as it does not try to charge a full battery.
I have transferred this arrangement to my new installation of the Vire 7 and it works just fine. Most owners should be able to convert their engines for about £20/30 (30 to 45 Euro - price at May 2004).
Chris later provided a detailed description of the job. Click here for instructions on How to Add an Alternator.
Vire BVR owners must be more resourceful than Vire 7 owners. David writes from Ireland:- I recently mounted a alternator on my Vire BVR but on the other side of the engine to the dynastart. I fabricated a mounting, similar to the dynastart, to fit on the engine mounting bolts. I used a long "V" belt, salvaged from a washing machine, driving on the engine, dynastart and alternator pulleys. It seems to work OK but the belt slipped when starting the engine and needed tightening after 10 hours running. The unsupported length of belt from alternator to dynastart flapping about may be the the problem. The wrap round the engine pulley is small but the slippage is on the dynastart pulley. The alternator is a very short one. salvaged from a 1980s Ford Escort, and fits neatly in front of the carburettor.
David later cured his belt slippage problem:- A colleague suggested that using a 20 year old belt was asking for trouble as the rubber perishes over time. I replaced the belt with a new one ( and damn the expense!) and it doesn't slip or dust anymore.
For those who like pictures, here's what David's setup looks like: -
David also adds the information that "the stainless plate mounted in front of the cylinder supports the engine starter relay. I have since mounted the choke knob on the same plate".
JWG sent me some photos, which he found on E-bay, of another alternator installed "piggy-back" (i.e. without removing the original Dynastart), this time on a Vire 7.
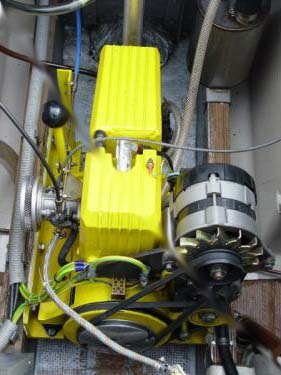
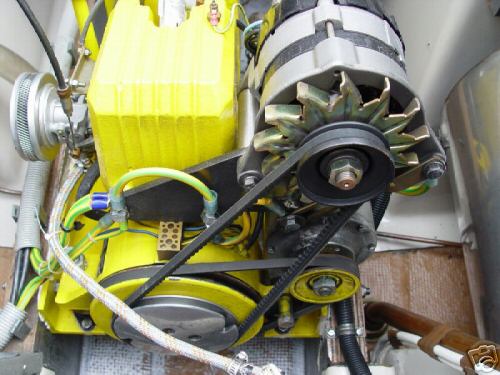
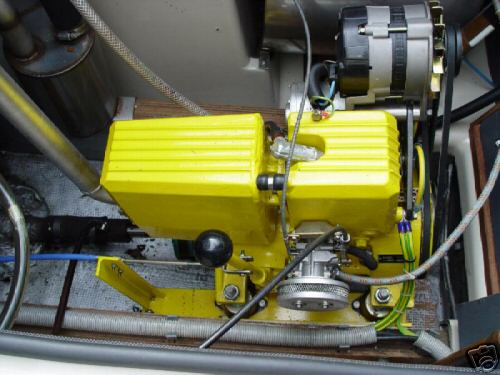
JWG comments: - The seller has written that he uses the Dynastart only for starting. The installation is particularly interesting because it uses the manual starting groove in the flywheel as a drive pulley (!). I think the installation would benefit from an additional support at the rear of the alternator. There does not appear to be any support other than the two brackets at the front, which could allow the unit to flex laterally from belt tension.
The Webmaster adds that there is, of course, another problem. If you ever have a flat starter battery, you will have to disconnect the alternator belt in order to use the hand-start pulley. But then, when the engine is running, you won't be able to re-attach the belt; so your alternator won't charge the battery, and you'll still have a flat battery at the end of the day. However, if you use two batteries, with a switch-over system, that won't be a problem.
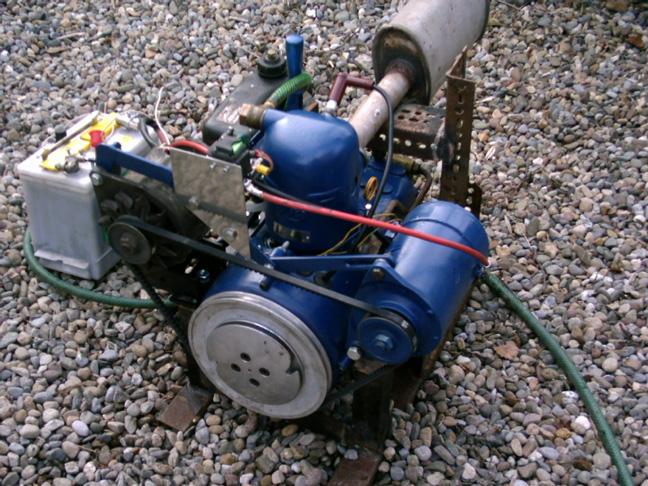
Pekka, in Finland, has installed his alternator with a layout very similar to the owner of the yellow engine, except that he installed the alternator on the side opposite the Dynastart. For those who like pictures, here's what Pekka's setup looks like: -

Pekka writes that his design is not patented, so it's free to all Vire 7 enthusiasts. The Webmaster adds the same comment as for the yellow engine - what do you do if your battery is flat, and you need to hand-start your Vire?
The Hints & Tips Pages have grown a lot since they were first established, but there's still plenty of room for more information. Why not E-mail the Webmaster with your own contribution? Vire 7 owners need all the help that they can get.


